こんにちは、データAI部の滑川(@tomoyanamekawa) & 工藤( id:irisuinwl )です。 今日(2021-12-01)、2人でGoogle CloudのSecurity Summitに「Security Command Center から始めるクラウド セキュリティ運用」というタイトルで登壇してきました! その報告と発表内では話しきれなかった各施策の実装面の補足の記事です。
背景
ClassiではGoogle Cloudをデータ基盤等で活用しており、Security Command Center (SCC)をプレミアムティア(有償版)で利用しています。 そしてSCCの顧客事例 として取り上げていただきました。 その流れもあり、今回登壇しました。
発表内容
今回の発表では、SCCを使ってGoogle Cloudのクラウドセキュリティ運用を進めていったプラクティスをアプリケーション開発の視点とOrganization管理の視点で紹介しました。
動画と資料
こちらに動画と資料を置いておくので、詳細はこちらをご覧ください。
発表の概略
- アプリケーション開発プロジェクトでのSCCを活用したセキュリティ運用を紹介
- SCCを活用したインフラ管理
- GKEのセキュリティ運用
- SCCのテスティング
- Organization全体のクラウドセキュリティ運用をSCCドリブンで始めて、拡充していった
- SCCの検知・カンバンへの起票システム
- セキュリティガードレール
- ログの収集・保管・活用
- 社内ポリシーの策定
- SCC が出来ないことを把握して、仕組みとその他システムを組み合わせて運用することが大切
- SCC ドリブンにクラウドセキュリティ運用を進めることができるので、わからない人・組織こそ「まず SCC を試してみる」のがオススメ
補足(発表で紹介できなかった詳細)
Web Security Scannerのテスト
Web Security Scannerのテストについて解説します。 Web Security ScannerはSecurity Command Centerの機能の一つで、Google Cloud上に構築されたアプリケーションの脆弱性をスキャンするサービスです。
XSSのあるアプリは以下のアプリケーションを利用しました。
https://github.com/bgres/xss-demo
deploymentするためのconfigは無いので自作しました。 資料の通り、GKE上にデプロイして、Identity-Aware Proxy を設定しました。 GKE環境は以前ブログで紹介したプロトタイプ環境を用いました。

Web Security Scannerの設定
IAPでアクセス制限されたアプリケーションへのWeb Security Scannerでのスキャン設定について記載します。 Web Secrurity Scannerのドキュメント手順に従い、新しいスキャンを作成します。
ここで、認証の部分は Identity-Aware Proxyを選択します。

OAuth クライアントIDはAPIとサービス > 認証画面でIAPで利用している認証画面のOAuthクライアントIDを入力します。
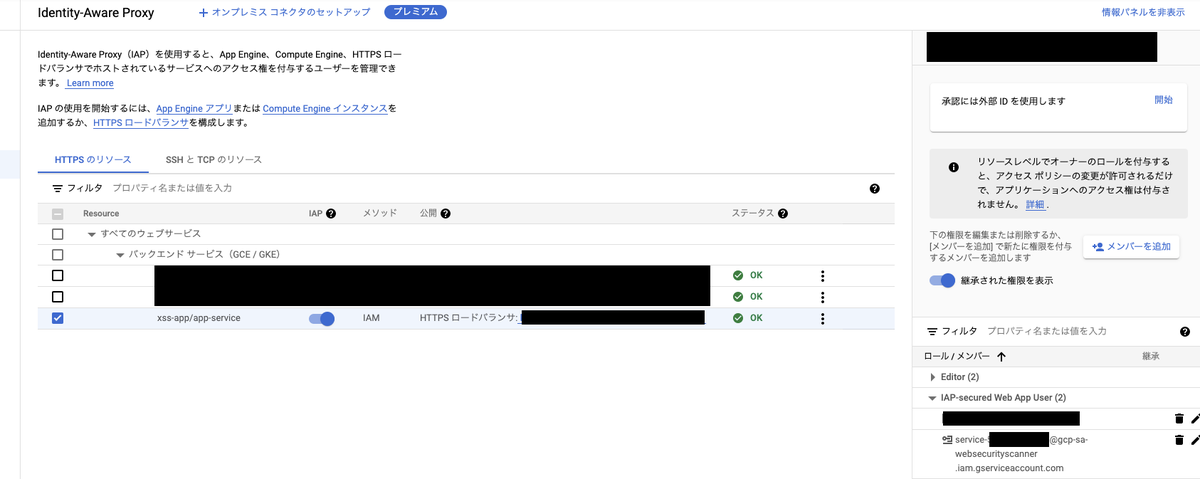
また、IAPがweb security scannerを認証出来るように、IAPの設定画面で認証するIAMの設定を行います。
IAP-secured web app userに IAPで保護さたウェブアプリユーザーロールを持つ以降に記載のservice-${PROJECT_NUMBER}@gcp-sa-websecurityscanner.iam.gserviceaccount.comを追加します。
Asset Inventory のFeed
SCCで検知できないリソースをAsset Inventory の Feed経由で検知します。 公式ドキュメントに従ってfeedを設定します。
gcloud asset feeds create FEED_ID --organization=ORGANIZATION_ID --asset-names="ASSET_NAME"
--content-type=CONTENT_TYPE --asset-types="ASSET_TYPE"
--pubsub-topic="TOPIC_NAME" --condition-title="CONDITION_TITLE"
--condition-description="CONDITION_DESCRIPTION"
--condition-expression="CONDITION_EXPRESSION"
ここで、ASSET_TYPEはgoogle re2を用いることができます。
また、CONDITION_EXPRESSIONはCommon Expression Languageを用いて表現します。
変更されたアセットの状態はTemporalAsset オブジェクトから取ることで、feedの設定をします。
条件式の例は条件を使用したアセット変更のモニタリングを参照ください。
例) BigQueryのResourceが国外に作成されたときの検知
例として、BigQueryのResourceが国外に作成された場合に、Asset Inventory経由で検知する設定をします。
gcloud asset feeds create forbidden_create_bq_resource_except_for_asia_northeast1 --organization=$ORGANIZATION_ID \
--content-type=resource --asset-types="bigquery.googleapis.com.*" \
--pubsub-topic="$PUBSUB_TOPIC" --condition-title="except_for_japan" \
--condition-expression='!temporal_asset.deleted && !temporal_asset.asset.resource.location.contains("asia-northeast1") && !temporal_asset.asset.resource.location.contains("asia-northeast2")'
ASSET_TYPEはbigquery.googleapis.com.*として、bigqueryのAPIでのAssetのみを対象としますCONDITION_EXPRESSIONはAssetの削除は除き、国外にあるものを検知する設定を書きます- 「Assetの削除でない」は
!temporal_asset.deletedと記載します - 「locationが国内にある」は「
asia-northeast1を含む or locationがasia-northeast2を含む」となります- この否定を取った条件式は
!temporal_asset.asset.resource.location.contains("asia-northeast1") && !temporal_asset.asset.resource.location.contains("asia-northeast2")'になります
- この否定を取った条件式は
- 「Assetの削除でない」は
サービスアカウントキーの自動削除の仕組み
サービスアカウントキーを一定期間で自動削除していると紹介しましたが、その実現方法です。 Google CloudのAPIでこの3つがそれぞれ取得できるので、組み合わせて組織内のサービスアカウントキー一覧を取得しています。
組織内のproject一覧
  def fetch_gcp_projects():
      credentials = GoogleCredentials.get_application_default()
      service = discovery.build('cloudresourcemanager', 'v1', credentials=credentials)
      gcp_projects = []
      page_token = None

      while True:
          request = service.projects().list(pageToken=page_token, filter='name:*')
          response = request.execute()
          if response.get('projects') is not None:
              gcp_projects.extend(response.get('projects'))
          page_token = response.get('nextPageToken')
          if page_token is None:
              break
      return gcp_projects
project内のサービスアカウント一覧
  def fetch_service_accounts(project_id):
      credentials = GoogleCredentials.get_application_default()
      service = discovery.build('iam', 'v1', credentials=credentials)

      service_accounts = []
      name = f'projects/{project_id}'
      request = service.projects().serviceAccounts().list(name=name)
      while True:
          response = request.execute()
          if response.get('accounts') is not None:
              service_accounts.extend(response.get('accounts'))
          request = service.projects().serviceAccounts().list_next(
              previous_request=request, previous_response=response)
          if request is None:
              break
      return service_accounts
サービスアカウントのキー一覧
  def fetch_service_account_keys(project_id, service_account_email):
      credentials = GoogleCredentials.get_application_default()
      service = discovery.build('iam', 'v1', credentials=credentials)

      service_account_keys = []
      name = f'projects/{project_id}/serviceAccounts/{service_account_email}'
      request = service.projects().serviceAccounts().keys().list(name=name, keyTypes='USER_MANAGED')
      response = request.execute()
      if response.get('keys') is not None:
          service_account_keys.extend(response.get('keys'))
      return service_account_keys
そして取得したサービスアカウントキーを作成日時などで仕分けて、下記のように削除しています。
def delete_service_account_key(service_account_key_name):
    """
    delete_service_account_key
    service_account_key_name:
        'projects/my-project/serviceAccounts/my-service-account/keys/my-key'
    """
    credentials = GoogleCredentials.get_application_default()
    service = discovery.build('iam', 'v1', credentials=credentials)

    name = service_account_key_name
    request = service.projects().serviceAccounts().keys().delete(name=name)
    request.execute()
Workload identity federationの例
S3からGCSにデータ転送する際にid federationを利用しています。 公式ドキュメントを参考にAWSのIAM Roleを作成して、Data Transfer jobで使えばAWSのアクセスキーなしでデータ転送ができます。 執筆時点ではWeb UIからこの方法はできず、API経由でTransferJobの設定をする必要があります。
Pythonのクライアントライブからjobを作成する例
def create_transfer_job(
    description,
    project_id,
    start_date,
    source_bucket,
    destination_bucket,
    source_type,
):
    """
    Create a one-time transfer from Amazon S3 to Google Cloud Storage.
    ref:
        - transfer_job: https://cloud.google.com/storage-transfer/docs/reference/rest/v1/transferJobs#TransferJob
        - schedule: https://cloud.google.com/storage-transfer/docs/reference/rest/v1/transferJobs#Schedule
    """
    transfer_job = {
        "description": description,
        "status": "ENABLED",
        "projectId": project_id,
        "schedule": {
            "scheduleStartDate": {
                "day": start_date.day,
                "month": start_date.month,
                "year": start_date.year,
            },
            "scheduleEndDate": {
                "day": start_date.day,
                "month": start_date.month,
                "year": start_date.year,
            },
        },
        "transferSpec": {
            "awsS3DataSource": {
                "bucketName": source_bucket,
                "roleArn": AWS_ROLE_ARN[ENV][source_type],
            },
            "gcsDataSink": {"bucketName": destination_bucket},
            "transferOptions": {
                "deleteObjectsUniqueInSink": True,
            },
        },
    }
    print(transfer_job["schedule"])

    storagetransfer = discovery.build("storagetransfer", "v1")
    result = storagetransfer.transferJobs().create(body=transfer_job).execute()
    print("Returned transferJob: {}".format(json.dumps(result, indent=4)))

    return result
おわりに
発表でも触れた通り、クラウドセキュリティ運用はこれで終わりではなく、まだまだやることが多いので引き続きブラッシュアップしていきます。
データAI部では一緒にデータを守る堅牢なセキュリティを有したデータ活用基盤&アプリケーション基盤を作っていく仲間を募集中です!
興味を持っていただいた方はこちら